Wednesday, November 30, 2011

Basement Part III

You have seen parts I, II, and the design boards and layout and I just realized you should have seen part III before the design boards. I hope seeing these might give you more of an idea of how the space is coming together but maybe you just need to wait until the end to figure it out.
Here is an image from the far right corner of the basement looking towards the stairs. The double door are leading to the unfinished basement which will be a storage area with lots of shelves and bins with out of season clothes and other such items. I love to organize so I can not wait to get my hands on this area and show you the final result. The door to the left of those double doors leads to the furnace. We decided to put a door there so that we can access the ac/furnace unit until it dies. It is old and we know that will happen soon. Once that does happen and we are forced to buy a new one we are going to have it face the other direction (toward the unfinished side). We are putting vents in that small section of wall between the doors so that there is airflow for the furnace.

Do you see those small paint swatches hanging to the right of the double door? Those are the ones we were looking at to make our final paint decision. We went with the top color, nice and bright apple green.
This is a view from the same spot looking towards the stairs and bathroom door. The wall between the room and stairs we decided to open part of it so that you the stairs do not feel as closed in as you walk down. It is nice to see the basement as you walk down the stairs. The door to the left in the corner is the bathroom door. There is already an old not usable bathroom under the stairs that we have to gut and redo in a year or so. The door that was there before was a bi fold door and I just hated it. This door is going to be much better and feel more secure.
Here we have a view of the entire wall. The walls needed to painted and the doors and woodwork. Look at that mess!

The stairs used to be open on the left side (looking into what is now the unfinished side). We closed that up and put up the half wall (has to be 3' off the stairs for safety) to open it up a bit like we are used to. It felt so closed in and tight when we first walked down them after closing the space up but now we are used to it and love the concept of compression and release as we go from walking down the stairwell and then it opening up to the basement.
Here you can see the set of stairs that was there already (the grey part) and then we had to put new backs on them because they were open, and then also put baseboard on the sides of the stairs to finish it off. It took a while for the husband to make all of those cuts but the stairs are so sturdy now, no creaking, and look great!

Oh I am so excited to show you guys more. Be ready for Part IV which includes all the painting, baseboards, flooring and rugs. 

Tuesday, November 29, 2011

Where's Waldo?

I loved that book growing up! I could spend hours looking for Waldo in all of those crazy places. Well I wanted to let you know where you can find me and my items for sale.

I will be at the Cotton Babies South County store this Saturday for their Holiday Bazaar. I will have my baby items with me and be sure to stop by Friday night as they will have other local vendors with things just for Mom's.
To keep track of where I am going to be check out the right side of my blog under "Where to find me?"

Monday, November 28, 2011

Cover Up In Green

I am pretty sure that this is a new favorite color of mine. It is so bright and happy during these dreary winter days. We FINALLY finished painting the basement and I just realized that it is about this color. Don't freak out, it is not on all four walls and it looks great. I hope to show you another basement update this week and then the finished product in the next few weeks! It is coming together.

Here is a very neutral but feminine breastfeeding cover. I this the slight flowers in this fabric are rather pretty and feminine for the woman wearing it but it is not in bright bold pinks and purples so that it can be worn with either sex child if the mother is concerned about strangers not being sure what her child is. Don't worry that happens even if they are dressed in all blue or all pink. Go figure.

This was for a friend of a friend and this baby came to this world with a minor issue and I am not sure that the mom was able to use this. If nothing else it is a great cover for when pumping and even over the car seat to keep the sun out of baby's eyes.

I hope everyone had a great weekend, back to the daily grind.

Friday, November 25, 2011

New Fabric/New Find Friday #93

I am taking it easy today so this post is going to be really short and probably not as exciting. BE WARNED. I am trying to figure out today...black Friday...if I need to buy these two items for my business or not. I told myself I wouldn't do it yet but they are calling to me! AH Do you ever have that problem where you want to spend money but know you shouldn't but know if you did it would make everything you do easier?! The day is not over and I could still click the buy button...we will see.


Anyway this fabric I picked up when the local Ben Franklin by my house went out of business. I was making THIS Halloween costume for my cousin and used the ribbon and blue felt for that vest. These items were perfect and I think the vest turned out pretty good.
The black and yellow I was going to use to make a Halloween costume for baby bee. I even bought a little hat I will have to show you later. I decided to do something easy and use a sleeper/costume that I already had. I might make the bee costume next year when he can fit into the hat a bit better and we can take him house to house for candy.

I hope all of you aren't too full from yesterday's meal and that you are enjoying the day off, if not the weekend is almost here!

Wednesday, November 23, 2011

Basement Design Plans

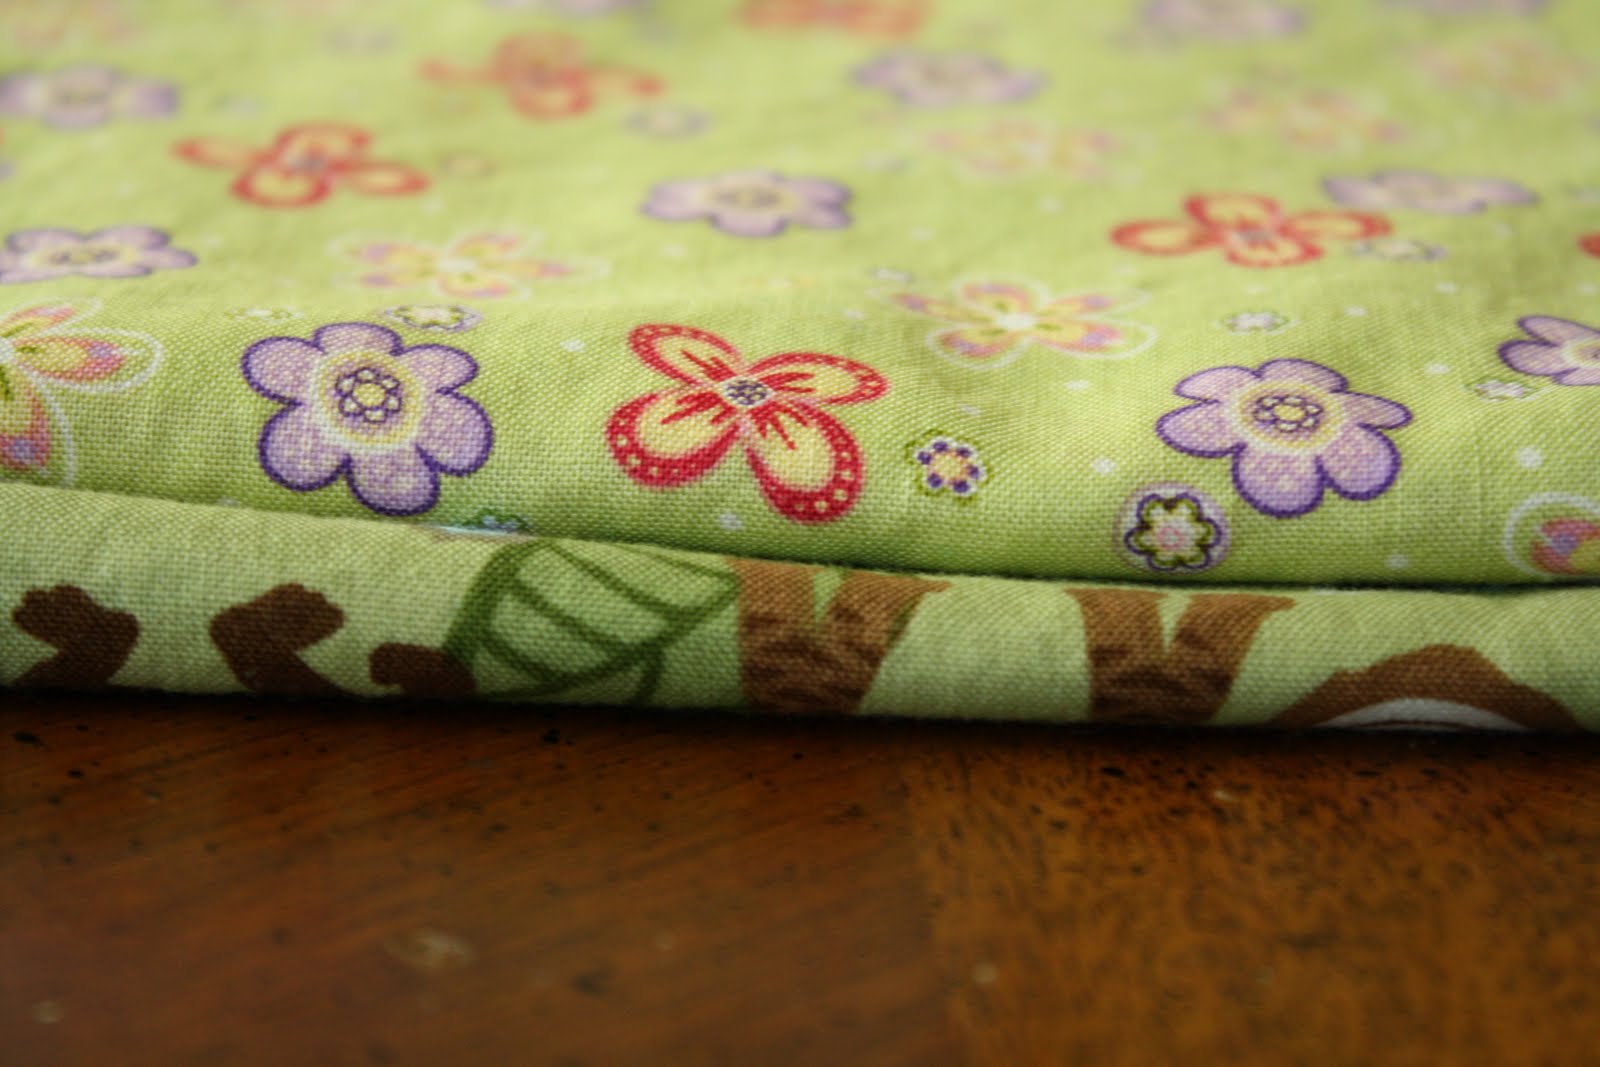
I wanted to show you the basement design plans. I have a feeling that a few of these images are going to be too small so try clicking on them to make them larger so you can read the labels. First off we have three pieces of materials that are the main focus of the basement. The antelope carpet (small square with white dots), the faux wood foam floor (small puzzle piece), the futon cover (stripe) and the carpet for the office area (large stripe carpet under everything).
These were the pieces that I had to work with when designing the space. I knew I wanted to use the antelope rug and you heard how the faux floor came about here, and the stripe rug I had a small piece of so I thought that would be perfect in the office area. The futon cover I saw at Bed Bath and Beyond one time while shopping and it was on sale and I just liked the way it looked (better than the old black cover) and thought the colors would go great with the two carpets that I already was using.

 So here is my design board of the basement, it is sort of a mish mash and I will do my best to walk you though it. Using the pieces that I already had (the carpet, floor and futon cover) I started working on the space. Let's start at the top left of the image and work our way around. The image of the shelves with the desk coming out of it gives you an idea of what is going to be back in my craft area. The shelves are going to be white with a white Ikea desk coming out from it and a white ikea 2 x 2 shelf on the end where they have those clear plastic shelves. I am going to put my sewing machine table to the right of where those clear plastic bins are to create a U shaped work area.

Next is the wall color, bright green! I pulled that color from the futon cover and since it is really only on one wall and two posts of the basement we thought a bold color would be great. I am excited about this color. Next you see again the futon cover and an image of what our futon (from the hubby) looks like now. I think the new cover will be a great improvement. Especially since it will be sitting on the antelope rug that you see a picture of just below the futon image. I love this rug and it will be on half of the basement floor.

The squares of carpet where discontinued from work and I had them put together to make a fun rug for baby bee. That rug is going to go under his small table and chairs which should be great to hide the marker and paint stains, or at least blend right in with the bright colors. There is another picture of the faux wood floor, I think it is going to look great.

The green stripe rug almost has a sisal textured look to it but it will be much easier to clean and it is in the same color palate as the wall color and futon cover.

Then there is the really awesome craft table that I bought one just like it on craigslist for a steal! I am so excited about it and can not wait to show you this particually when the basement is finished. It is counter height wich is going to be great as a cutting table and I will probably make an ironing surface and iron there while I cut. The sides will hold all of my fabrics in bins. 
This is a rough floorplan of the basement so you can get an idea of where everything is going. Not all of the furnature is labeled but you get the idea. I just can not wait to finish it so we can move things back in and show you how it turned out.

I hope you have a Happy Thanksgiving. We are going to be working hard on the basement!!

Monday, November 21, 2011

Holy Family?

Ok not really. I just thought it was too cute that I made two bibs for a Mary and a Joseph, just in time for Christmas. I really am starting to love these personalized bibs and they make me so happy each time that I make one. I really hope they catch on for new babies.
One of my friends had baby #2 named Joseph. I was already working with this fabric and thought it would be great for a girl or boy so I decided to use it. I also saw that a friend "my muse" used a lower case j and I wanted to give that a try. I like how it turned out but maybe I should have used the lower case j in the name as well.
Baby Mary is the sweetest thing and I have gotten to spend several visits with her and she is such a cutie. I used again this fabric and instead of pulling out the red or orange I decided to pull out the sweet ice blue that is in the fabric. I really wish it was a bit bolder of a combination but I think it is okay and I also wonder if the name was in script font if that would have looked better. There is always next time.
I had a great weekend with a lot of exciting things coming down the pike that I can not wait to tell you about and LOTS of work done on the basement. I am so excited to be near the finish line with that.

Friday, November 18, 2011

New Fabric/New Find Friday #92

Just a reminder that you have until the 20th to enter this giveaway for the ruffled scarf.  If you haven't gone to this Facebook page to win this breastfeeding cover her page is only 100 likes away from picking a winner.

Today I have some fun baby fabrics, I picked these up in hopes of turning them into blankets when I catch up with myself. I think they would also work for applique on kids shirts depending on the age.
I really just love the animals on the top fabric, they have those cute big eyes and look like cartoon versions of the animals. This would be a fun "boy" fabric with out being over the top blue. I think it would also work for on a girl's shirt for those who don't really like pink everything.
The small flowered green fabric is just such a sweet print. I think those mom's who hate pink might be able to get over the small amounts of hot pink in this fabric since the main focus is on the green and purple. Couldn't you see this with a purple fabric on the back?!

I hope everyone has a great weekend. Are any of you going to shop local this Saturday and most importantly next Saturday for Small Business Saturday? I love local boutiques and can not wait to go out and see what I can find. Feel free to shop my small business via Etsy or email me for Christmas orders....I can still make things in time.

Wednesday, November 16, 2011

Georgie Porgie

This set is for a new little baby whom I finally got to meet a few weeks back and he is a cutie! My husband has done some work for them and we are becoming friends and he thought it would be great to make them a little something and I agreed. :)
Just a simple bib with a matching burp cloth for cleaning up what I hope will not be a lot of spit-up. I like the way this set turned out, the burp cloth is not a coordinating pattern by the same maker but I think they look great together. The name George is so cute and it seems to fit the little man. Hope this little man is doing well and enjoying his new wears.

Monday, November 14, 2011

Personalized Napkins

I have been wanting to explore the world of napkins for a while and I finally pushed myself to make some from fun fabric (you will see those in a few weeks) and personalize some plain white ones that were already made.

First let's start with these monogrammed napkins. I bought these white napkins with a slight pattern on them and thought they would be great for our table and put our monograms on them. I am really trying to use less paper napkins so these cloth napkins are going to be great for us to use at the table. We end up using the same napkin for several days since they don't get that dirty at one meal so it will be nice to know who's is whos.

Then I decided to make something a bit universal and saw ones like these on Etsy and thought these were cute. Something you could put on your table for guests or at every seat when having a dinner party. These were done on plain white cotton napkins with black screen printing ink.
These next napkins I also saw on Etsy and thought these would be great to have a set. Now really how fun would these be to have at a dinner party where you can tell your guests that they are sitting at seat number 1, 2, 3, etc.
Finally I thought one simple initial would be a nice touch. I did all of these in black but how fun would they be in the colors that coordinate with your house. You could do all of them the same, last name initial or all of them different, for each member of the family's first name. A red letter or number to go with a red dinning room?  Fun.

Well I had a lot of fun making these napkins and think custom ones would be great, have any ideas? What about ones with orange turkey's on them for Thanksgiving? That would be cute. Maybe I will have to make a set for my family.

I have these posted on Etsy so if you feel like you need to have some napkins like these come on over and get some for yourself.

Saturday, November 12, 2011

Fall Pinterest Challenge

I am a week or so behind but I wanted to post this anyway because I had such a fun time making my item from Pinterest that I wanted to share it. Do you remember when I participated in the summer challenge that Young House Love put on? You can see that post here. Well here I am to show you my fall Pinterest challenge entry.
A good friend of mine was making some Merry Christmas Bunting and I have seen so many on Pinterest that when I found some pretty red burlap fabric at the store I thought I should make a bunting of my own for my Christmas decorations.
Pinned Image
Inspiration photo one was found on Pinterest (I did change it a bit to make it my own) and you can find the original link to the Christmas bunting Here. I liked the idea of stenciling or stamping the letters onto the burlap.
Pinned Image
I also saw this image on a friends board and this got me thinking to use this bunting that I made not only as a decoration in my house but also for our Christmas photo (which we are taking tomorrow). How sweet is this picture, it came from this photographer's website. I think we are going to have to break the words up like the first image to get it to fit into our picture. We will see.

And....here is what I came up with.
I am sorry that I did not take any process photo's for you this time. I was doing this late one night and did not really think about taking picture in my dark and MESSY family room. I can walk you though the process though and maybe that will help you. I bought the red burlap and thought of this project immediately. I thought it would be great to use black screen printing ink to put the letters on the burlap. I cut the shape of the flags out of vinyl with my silhouette machine and then stuck that on my burlap as a template. That made it VERY easy to cut the shapes out since the burlap moves a lot. Then I used the vinyl as a stencil for the letters and painted in the letters. It was very easy, the hardest part was making sure that I put enough black paint in it to show up and not getting that black paint on anything that I set it on while it was drying.

It is really simple but I like the that and I think this is going to be a great addition to my mirror in my living room at Christmastime.

Check out the other women who put this challenge on, Katie, Sherry, Ana, and Erin. Also go Here to check out other bloggers like me who took the challenge and actually did it in time!

Friday, November 11, 2011

New Fabric/New Find Friday #91

I am having a strange fascination with seersucker fabric. I keep seeing it at the fabric store and cannot stop myself from buying it. It reminds me of my father-in-law and I think baby bee would look so cute in a seersucker outfit.
The lady at the fabric store made a comment to baby bee "I bet all of these fabrics are for you," well those weren't but I think this will be. I am thinking it would be cute to make summer jumpers out of these for him. Simple ones that button at the shoulders and I can do one short pair and one long pair. I would like to get working on them now but I think I might wait a few months since I have no idea what size he is going to be in the spring/summer.
Don't these just remind you of those cute seersucker blazers? If I get adventurous I might try a pair of pants (elastic waist) and a jacket.  We are so traditional around here with our clothing that I think he is going to look so cute in these!! I can't wait.

Also I wanted to say thank you to all of the Veterans who make our country safe. Thank you!

Wednesday, November 9, 2011

New Scarves

Speaking of scarves here are a few new scarves that I made a few weeks ago that I thought would be fun for summer, but really you could wear them anytime of the year.
This first one is made from a grey cotton jersey fabric that has some small yellow flowers with gold overlay on some of them. I gathered it with some elastic thread to give it some bounce and movement. I like how casual it looks compared to the other scarves I make.
This scarf was supposed to be the same look as the grey scarf but ended up being a bit thinner than the grey one and so it looks a bit more wispy than I was going for. It is made from that shirred tee-shirt material that has some voids in it, making the cotton a bit lighter and it also is cut on the bias so it curls up a bit more than the other. I actually like how thin it is and is perfect on hot days when you want to just add something of interest around your neck, sort of like a soft necklace. That is great these days for babies to play with and not be able to break.
Finally there is this black beauty. This one is made from a shear fabric and is gathered along the width making small little ripples or bubbles down the scarf. I think this one is fun to wear long or wrapped around your neck. This one could take you from summer to winter.

These have been posted on my etsy site and are ready for purchase!

Monday, November 7, 2011

Pretty Fall Scarf (Giveaway)

I had a great weekend and thank you to everyone that stopped by the Christmas Boutique, we had a great time. I am still catching up on sleep from all of those long nights preparing and I will have to report later if I made it through my 30 day challenge.

Today I have another exciting giveaway today but this time it is for a scarf! I am hoping that more of you will be excited about this than a breastfeeding cover, or at least more of you would use this than a breastfeeding cover.

The details:

What: One grey scarf seen in the pictures below(does not come with the broach shown in the pictures)
Where: Go to  http://ajillofalltrades.blogspot.com/2011/11/youll-love-it-too-giveaway.html to enter.
When: You have until the 20th at midnight to enter
How: Winner chosen randomly and you must go to her blog to enter (all comments here are just for fun and to be nice, comments there actually count). Here is how to enter the giveaway on A Jill Of All Trades....

1- Become a follower of this blog via GFC or Networked Blogs and leave a comment with your e-mail address.

2- Go to You'll Love It Too and tell me your favorite item and leave a comment with your e-mail address.


Here are images of what you will win....


Now go enter! Good luck!

Friday, November 4, 2011

New Fabric/New Find Friday #90

This is a really quick post today as I am trying to get everything finished for tomorrow. I bought these fabric while I was at the fabric store last for baby bee's quilt. I needed a few more solid fabrics to go with the fabrics in his room and here is what I picked out.
I have a feeling that I might be using this bottom fabric for other items as well as his quilt because I think it is so cute! A nice texture for a onesie with a letter on it.
Below are the fabrics that are in his room and the solids that I already bought for his room. I hope I can get started on this after Christmas for his Christmas/Birthday present, good thing he isn't old enough to know better. :)
I will be back next week with another giveaway and don't forget about THIS one that I told you about last week. She needs 1000 friends on Facebook before she draws a name and yours could be one if you "like" her on Facebook.

Wednesday, November 2, 2011

Basment Part II

I think it is about time to show you Part II of the Basement saga! I posted part one with the before picture here and it is coming along! Now not only do we have the walls up but we also have the ceiling grid up and tiles in place!! Whoot Whoot!
Here is a view of the right side of the basement. You can see how the walls looked before we put the panels up. We also fixed that window leak, can you see all of that grey haze running from the corner of the window to the ground? That would be where the water leaked, not anymore! Well we hope.

This is the left side of the basement. The house was built a while ago so the space from the floor to the ceiling is not that tall, to pass code we needed at least 6' of clearance so we were not sure about a traditional drop ceiling. The ceiling tiles would have been pretty close to the joists which would make it hard to push a tile up and out. We talked about a million options and finally compromised and decided to do a ceiling grid that attaches to the joists and the tiles clip into the grid. I said that I wanted flat tiles with no ripples etc so they look the most like drywall, which is what I would have preferred on the walls and ceiling.

Here is that same view again of the right side with everything in. We still need to paint the columns and soffit around the duct work but one step at a time. :) Is it starting to look like an office?!
This is the left side again, along with wanting flat ceiling tiles I also wanted can lights, not fluorescent tubes. We were going to do incandescent bulbs in the cans but they were so hot we decided to change to fluorescent. I just do not like the color that fluorescent lights put out and I also hate that they take so long to "warm up."

Anyway that is part II. Part III will be the fourth wall that divides that finished side from the unfinished side, the stairs and maybe even some paint?! We will see.

Share

Pinterest

Follow Me on Pinterest

Followers


Designer Jules: Copyright © 2008 Green Scrapbook Diary Designed by SimplyWP | Made free by Scrapbooking Software | Bloggerized by Ipiet Notez